Friday, February 11, 2011

Embossing Die Cuts Tutorial


We would like to bring you another tutorial today! Nanne started us off last week with a
wonderful ribbon flower tutorial and we'd like to continue bringing you new and some not
so new ideas but hopefully ones that will give you a ton of inspiration and ideas!
Remember our entire design team will be bringing you tutorials each week
in between our sketch/challenge weeks!
So something new to see each week!


It was brought to my attention that some people do not use their Cuttlebug (or other
embossing machines) as much as they would like. It really is such a neat tool
and can add so much detail to papercrafting projects that I decided to show you
how much it can add to die cuts.
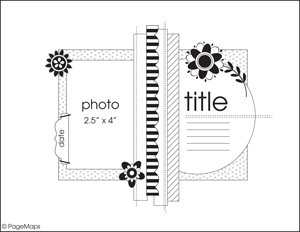
The layout above is really cute, really simple and shows you what a bit of embossing
can do, the small flower and scallop border for example.

Here is a list of basic tools:

Cuttlebug (or any embossing machine)
inks, chalks, etc
sanding tool (keep in mind that these
will really add more dimension and bring the embossing to life)
shimmer sprays (mine was made with mini misters
and Perfect Pearls)


I also wanted to show you what you can do when die cuts do not fit, like in the example below....


Since this piece was the background, I just cut the branches off and then carefully taped
it back together. For the trunk, I rotated the die cut to make sure I embossed
the entire shape. Now keep in mind how the embossing folder and the die cut
hanging off the edges will fit into the machine.


Now here is the layout completed but without any embossing...
you can really see the tremendous difference the embossing details make!


And now all the elements embossed and inked!
For the little worms body, I only put the body inside the folder and
kept the head out. But be careful what folder you use because this
one tore so I needed an itty bitty piece of tape to secure it back together.
The flowers were embossed by choosing a embossing folder with a flower on it (like Floral Fantasy), I then centered the die cut right in the middle of the flower and got a
flower design embossed on the flower die cut (those are for
the two smaller tulip flowers).


And lastly, some details of the completed project...


I truly hope this gives you some ideas and will help you to
incorporate embossing with your die cuts as well as just into
layouts in general!

xoxo, Leah

Friday, February 4, 2011

February 4th


A month into the new year and we have another great sketch for you! This one comes from Scrapbooks, Etc. magazine. They have an interesting mix of sketches, busy to extremely simple and this is somewhere in between. We always want you to come by and let us do the work of finding great sketches for you but you just got to love Google Images for giving you an easy way of finding these! That is how we came across this one.

Now before we get to the wonderful projects we would like to share a bit of news. We are sad to announce that we are loosing Debbie from Love Life's Little Pleasures and Lisa McIntyre from Bug Junkie. It breaks our heart as we so do love both of these designers but understand life it taking them another direction. You've got another chance to see them at Stuck on U Sketches as February 18th will be their last day with us!!! Thank you both Debbie and Lisa SO much for having joined us these past months!!!

So let's see what the DT has been up to....


Whale of a Memory
Leah Schaeffer


Brother
Nanné Harry


Merry and Bright
Sandi Clarkson
Memories
Fern Riley
Ferns Creations


Our Vacation
Debbie Burns
Love Lifes Little Pleasure


Happy Home
Beatriz Guzman
Amazing Grace


Flower in My Garden
Annette Gearside
Moment In Time


Good Times
Lisa McIntyre
Bug Junkie


Sommerglede (Summerjoy)
Stine Ursin
www.egen-hbbyblogg.blogspot.com


Friday, January 28, 2011

Lace Rosette Tutorial


Good Friday Morning to you lovely ladies...
Us girls over here at SOUS have decided to post some tutorials every other Friday..Which will be the non-challenge weeks.. We want to inspire you to try new things and we know that their are lots of techniques and methods that we all want to learn how to do..
So, to start off this years first tutorial, we are going to teach you how to make these ribbon rosettes.. I'm sure their are lots of tutorials out there for these, so its not an original idea.. We just want to share an idea and a technique and hopefully this will make it easier for you to try these at home.. They are very quick and simple to make..
So lets get started shall we:


for the supplies you will need:
  1. ruler for measureing
  2. scissors for cutting
  3. ribbon
  4. glue
  5. circle punch (or use your cricut)
  6. needle and thread (use the same color as your ribbon)
  7. brads of choice ( used the glazed from BG-which I got from Generations Crafting)
  8. cardstock
  9. white paper flowers ( you can use any color)
  10. hole punch (which is not pictured: I used my crop a dile)


step one: cut your ribbon/lace to 12" long.. this ribbon measures 1.5" wide, which will make a really big rosette..


step two: Run your needle and thread along the very edge of the ribbon like so..Weaving it in and out of the fabric..
step three: Once you have it weaved all the way, start to slowly gather the material together as you pull on the thread.. being careful not to cut the thread.. if you do, just start over again from the beginning :)

Step four: before tying the ribbon, sew the two ends together on the wrong side of the rosette..

step five: use your circle punch or your cricut to cut a small circle and then punch a small hole in the middle of it..

Step six: use some strong and quick drying glue (or glue gun) to glue the circle to the back of the rosette. Set aside to dry


for these flowers I used some white flowers and sprayed them with glimmer mist..

now add the brad through the two flowers and then place it on your ribbon rosette as so.. This way you can match your rosette with the ribbon runner on your layout...

Here is a smaller rosette I made using laced ribbon that measures 3/4" wide, a white flower and a brad..  You can use any ribbon or any lace to make these quick and simple rosettes..  It took me maybe 5 mins to make each one.. quick and simple!! :)
you dont' have to use a flower in the center either, you can cut a piece of cardstock or printed paper of your choice to match your layout.. I just like the way the flower looks..

We hope that this tutorial has inspired you to try to make these at home..They will bring lots of beautiful detail to any layout or card.. 
If you wish to see an example of a layout useing this same rosette, please visit Nanne's blog and see her "Blessing" layout..
Thank you ladies all so much for stopping and taking a look..
Hugs

Friday, January 21, 2011

January 21st, 2011


Sketch by: Patti Hutch

Is it just me, or does it seem like these weeks are just flying by?
I can't believe its time for another reveal already..We do love our reveal dat though and with that said, we have chosen a simpler sketch this week, but with it being simple it also gives you lots of freedom to play..
Our design team have surely outdone them selves this week by creating lots of wonderful examples for you to be inspired by..
Were hoping that this weeks sketch will inspire you to make it your own and let your creative juices flow..LOL
We'd also love for you to join us this week and link your layout back to us so we can have look at what you've created using this weeks sketch..


Can You Feel the Music
Nanné Harry


Baby's First
Leah Schaeffer


Christmas Fun
Annette Gearside


My 1st Truck
Lisa McIntyre

Beatriz Guzman
Frozen

Disneyland
Fern Riley
He holds her hand, she holds his heart..
Debbie Burns
Love lifes little pleasures

This weeks helpful tip:
Do you have a great stamp that you just love but only
want to use a single image from it?
Cut it apart!
Most can be assembled together again or used separately using
an acrylic block!
(like the red snowflakes on Leah's page)


Friday, January 7, 2011

January 7th, 2011


Happy New Year everyone and we have our very first sketch of the New Year up and running for you.. Wooo Hoo!! we made it...LOL
What a way to start the year than with a cute little sketch from pagemaps..
They have some awesome sketches, lots to choose from and they are very versatile..
All you need is a little bit of imagination, some great papers and a few choice embellishment and you will end up with a great page for your album.

But before we get to the Design Team work, all of us ladies want to thank everyone for the past year and for all the ladies that joined in weekly with their layouts.. You all mean the world to us and lets have just as much fun this year as we all did last year..
We're hoping to make this year extra special and get some more projects out there for you this year , some extra challenges, helpful tips and maybe even a tutorial or two..

well, with all that said.. lets get to the good stuff.


Family Tradtion
Sandi Clarkson

Forever in Love
Nanné Harry


Colton
Fern Riley

Sandkasse
Stine Ursin
Hobby Blog

Pensive Moment
Annette Gearside

Time
Beatriz Guzman

Merry Christmas
Leah Schaeffer


*This weeks Helpful Tip:
When working on a two page layout, turn the two base papers/cardstock upside down and push them together. add a few small pieces of masking tape over the seam to keep the two sheets together..Now, when you turn it back the right way, you can add your papers on both pages and they will allign perfectly.. No more off set papers.. remember to remove the masking tape carefully before you start adding embellishments