Friday, October 30, 2009

Oct 30 Sketch and Triple challenge!


Today is reveal day here at Stuck On U Sketches and we have a great sketch lined up for you. This is yet another one of Becky Fleck's awesome sketchs over at Pagemaps. ( Next week I think we are changing up a bit LOL)


Anyway, we are doing something special this week! We have teamed up with Practical Scrappers and Frosted Designs to challenge you to a triple! What's that? Well, each site has their own separate challenge for you this week ... but to become a winner, you have to meet all three challenges and post your project or projects on all three sites. Each blog will choose a winner and give individual prizes BUT you have to have met all three challenges and post on all three sites to win! You can incorporate the three challenges into one project or you can do 2 or 3 projects .. it's up to you! So, hop on over to Frosted Designs and Practical Scrappers after you have finished seeing what our Design Team has done with this week's sketch. Winners will be announced next Friday, so check back to see if you have won the goodies shown above! OUR challenge is, of course, to use this great Pagemaps sketch.


"Laugh"
Sandi Clarkson


"Natural Beauty"
Sandy Windsor


"Who Loves You"
Leah Schaeffer


"2's Company but 3's a Hoot"
Nanne Harry


Friday, October 23, 2009

Oct 23 Sketch

We are really enjoying the sketches that Becky has over at Page Maps! Such a great assortment there!
We hope that you will enjoy this weeks challenge...as well as the examples we have for you!

Thank you all for your joining in and we can't wait to see what you all do with this (something I am sure we'll say each week! LOL!)


Leah Schaeffer


"Boo Careful Out There!"
Sandi Clarkson


"Take These Wings and Fly"
Sandy Windsor


'


Thursday, October 22, 2009

100 Follower Blog Candy Winner!

Just wanted to announce our winner...thank you all for joining and getting us to 100 followers! We look forward to the future and to lots more fun together!
xoxo the DT!

Tammara!!!!!!!!!! Your the lucky lady!!!!!! Please leave a comment to get your prize!!!

Wednesday, October 21, 2009

Floral Branch Tutorial


With all the lovely layouts displaying beautiful floral branches I decided to try my hand at making one....here is a branch I made....it is very similar to the branch on my Through My Eyes layout...the flowers are different but the branch the same....if attaching all the pieces seem monotonous I would suggest attaching the wire branch to the layout and then building the flower and leave layers right on top of it...you can do this using a tacky glue....This is the branch I will show you today.....
I cut my leaves using my A Child's Year cart. I cut them in both 1 and 1/2 inches...chalk or ink...take a small piece of wire and glue it to the back of the leaf....fold the leaf to make sure it has good contact with the wire....let these dry.....


Begin adding the leaves to your branch by twisting the wire around the branch.

Glue the flowers to the leaves....at this point I added the smaller leaves by glueing them under the flower.

Cut some additional wire pieces at about 4 inches and spiral around a wooden sqewer.

Add these to your branches and you have created you own handmade floral stem....hope you have enjoyed this tutorial....can't wait to see how you use it!


Friday, October 16, 2009

Sketch Challenge #3 and a little blog candy~ we hit 100!


We hit 100 followers! Thank you so much everyone!

Good Morning Ladies..We are so excited because we have had so many participate in our sketches. They are so much fun..So for this week we chose a sketch from Page Maps by Becky Fleck. You can see how our design team was able to create such different looks using the same sketch..We hope you have fun with this one and we can't wait to see what you create.


Leah


Sandi Clarkson


Nanné


Sandy Windsor

We are nearing the 100 followers mark and to celebrate that we are giving away a little blog candy this week. The rules are that you have to be or become a follower and a leave a comment on this week's post. Winner will be announced next Thursday evening!


Tuesday, October 13, 2009

Inking and chalking Tutorial -#1 Tree


We've had some requests on how to ink and chalk some of the cuts from the cartridges..This will be the first of many to come..
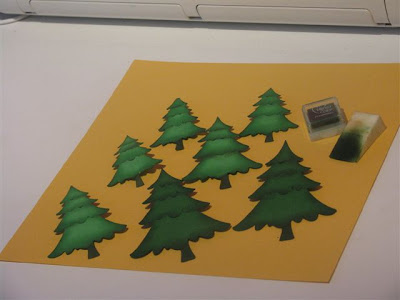
Here I have a tree that I had used on one of my layouts..
In the above  photo you see the before inking (lying flat) and the after .. I cut the tree using the Paper Doll Dress Up cartridge and green (light and dark) cardstock. For the inking, I used Tim Holtz Distress ink: Walnut Stain and Black, plus I used Versa Color: #29 Evergreen ink.  I also used dark green chalks by Pebbles,inc.. which you can see in one of the following photos..  The sponges that I used are just cheap make-up application sponges.. works great and they are very inexpensive.

*Remember to click on the photo to open a bigger one..
 
For the first step.  dab your sponge in the brown (Walnut stain) ink and rub it generously to all of the out side edges and dab it on the bark of the tree (we want that brown).. also, bend the paper at the seems and ink the tips of those as well..I usually hold the tree with one hand and apply the ink with the other.  I never lay them flat when applying ink, only when I cover a larger area..
*Just remember that we are only working on the edges and the seams..

Then  apply some green ink to a clean sponge and just lightly rub/dab the ink working  from the edge towards the middle, but staying close to the edge.. You can add as much or as little as you want..You can really see the difference in the lighter trees..


Then your next step is to take dark green chalk, a medium size cotton ball or q-tip and add the chalk to the edges by applying it in a small circular motion..We always want the edge darker than the rest of the tree.
.  *Do not chalk the bark green, leave it brown..


Now, take the a clean sponge and add some black distress ink to it.. rub the ink along the very edge and then dab it onto the bark of the tree.. were only adding a little bit of shadow to the edges..
We dont' want to cover any of the green ink or chalk...


*Once you have cut the tree (paper doll dress up cartridge), the cricut will cut seems along the tree, where you will first ink them and then with your fingers carefully push the seems open, carefully not to tear the sides (the sides will hold it all together so you don't have 4 different pieces..)
Once you have the seems open, you will bend the layers down towards the trunk of the tree..and this will give you the layering.
It will be little bit difficult, but not impossible..
It will add some dimension to your layout..


So, from This


To This!!!
This is what your final tree will look like.. This isn't the best photo, but you can see what it looks like on a layout by clicking HERE..
And all of it cut with just one piece of  green cardstock..you can use pop dots to apply it to your layout or card and that will give it even more of a 3-D look.. leave it as is or you can decorate it like a x-mas tree, etc..  Just let your imagination run wild..

Friday, October 9, 2009

Our second challenge 10-09-2009

Wow, we are so excited about the great response we've had to this new challenge blog and thank you so much for your comments, your participation and your support. This week we are presenting one of Liz Qualman's sketches shared on Scrapbook.com.  It is called Challenge sketch Sept 30, 2007 or simply Fall Sketch 1_5.  So, without further ado, here it is and here are our submissions! We hope you will join us this week. I think you'll find this one to be a little easier.


Sandi Clarkson


Nanné


Sandy


Leah


Thursday, October 1, 2009

Our debut and our first challenge!

Pagemaps sketch Jan0912x12b


Sandy Windsor


Nanné Harry

Nannes Creations


Sandi Clarkson


Welcome to our first challenge....We decided that we would use a Pagemaps sketch from Becky Fleck for this one....there are no other requirements for the challenge....just see what you can come up with. Thanx, Nanne for choosing the sketch for this week. We had lots of fun and were all very anxious to post our layouts. ... as you can see we each come up with something very different....and we know that each of you has something to inspire us with. We hope you like the sketch as much as we did! Use Mr. Linky to link your take on the sketch. If he isn't working for some reason, leave a comment with a link to your blog post or just email your contribution to us and we will upload it for you.
The deadline for this challenge will be next Thursday 8th of October at Midnight.. and a new challenge sketch will be posted Friday October 9th..